
Uncategorized
Rectangular Shaker Clutch Bag Silicone Mold with Findings
If you have a rectangular shaker clutch bag silicone mold with findings, the process of making the clutch will be similar to the steps outlined above. Here are the steps to follow:
- Clean and dry your silicone mold.
- Mix your epoxy resin according to the instructions on the package.
- Pour a small amount of resin into the bottom of the mold, enough to cover the bottom completely.
- Add your shaker fillings to the mold. You can use a toothpick or small spoon to place them carefully in the mold, making sure they are spread evenly throughout.
- Add your findings, such as small charms or beads, to the mold.
- Continue adding layers of resin, shaker fillings, and findings until the mold is filled to the desired height.
- Allow the resin to cure for the recommended time.
- Once the resin is fully cured, carefully remove the clutch from the mold.
- Attach the metal frame and clasp to the clutch according to the manufacturer’s instructions.
- Your rectangular shaker clutch bag with silicone mold and findings is now ready to use and enjoy!
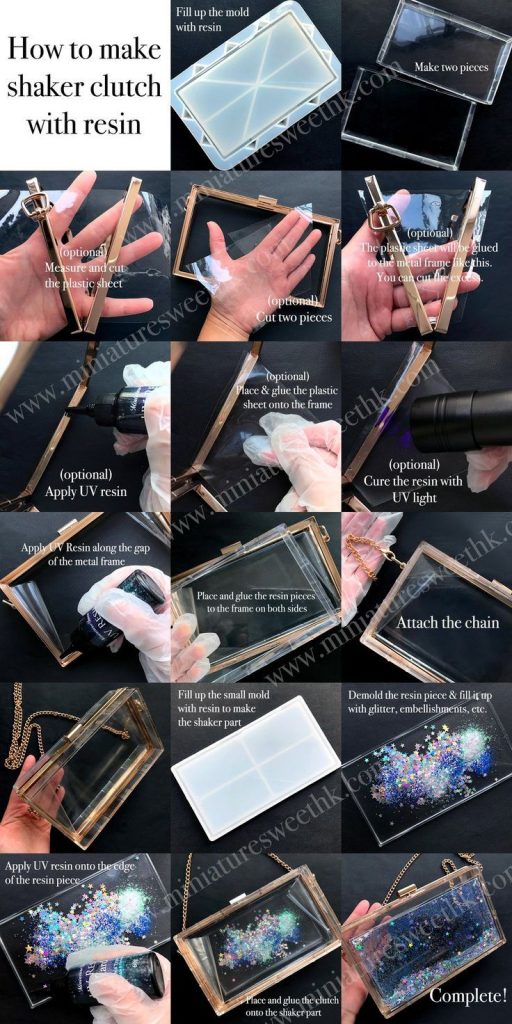
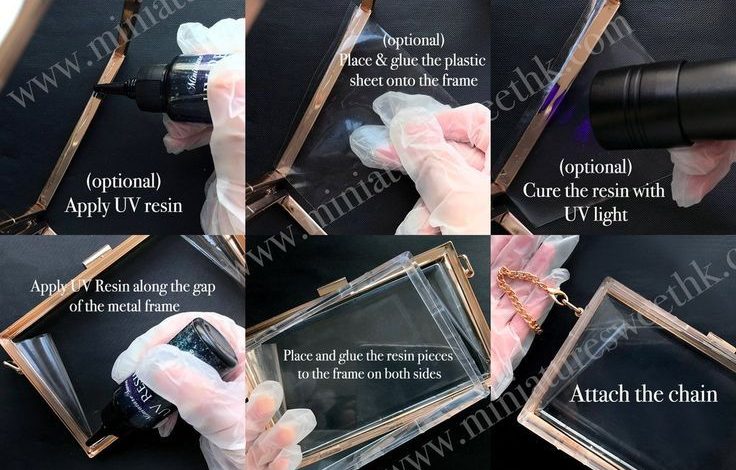
How to make shaker clutch with resin ?
To make a shaker clutch with resin, you will need:
- A silicone mold in the shape and size of the clutch you want to make
- Clear epoxy resin and hardener
- Various small items to use as shaker fillings, such as beads, sequins, glitter, small charms, etc.
- Silicone glue or hot glue gun
- Clasp or chain to use as a handle for the clutch
Here are the steps to follow:
- Prepare your silicone mold by cleaning it thoroughly and making sure it is completely dry.
- Mix your epoxy resin according to the instructions on the package. You will need to mix equal parts of the resin and hardener together until they are well blended.
- Pour a small amount of resin into the bottom of the mold, enough to cover the bottom completely.
- Begin adding your shaker fillings to the mold. You can use a toothpick or small spoon to place them carefully in the mold, making sure they are spread evenly throughout.
- Continue adding layers of resin and shaker fillings until the mold is filled to the desired height. Be sure to leave a small amount of space at the top of the mold to add your clasp or chain.
- Allow the resin to cure for the recommended time, which is usually around 24 hours. Be sure to follow the curing instructions on your resin package carefully.
- Once the resin is fully cured, carefully remove the clutch from the mold. If the clutch is difficult to remove, you can use a little bit of silicone or hot glue to help loosen it from the mold.
- Attach your clasp or chain to the clutch using silicone or hot glue, making sure it is securely attached.
- Your shaker clutch with resin is now ready to use and enjoy!